
· 4 min read
Grejo Joby

1. Key Promoter X

The Key Promoter X helps you to learn essential shortcuts while you are working. When you use the mouse on a button inside the IDE, the Key Promoter X shows you the keyboard shortcut that you should have used instead.

This provides an easy way to learn how to replace tedious mouse work with keyboard keys and helps to transition to a faster, mouse free development.

img.png

2. Turn Autoscroll ON

Right mouse-click to the Project bar and enable Autoscroll from Source.

Whenever you open a file, It will scroll over to the file in the project tree. You will be able to see the expanded folders and sibling files as well. Try enabling Autoscroll to Source as well.

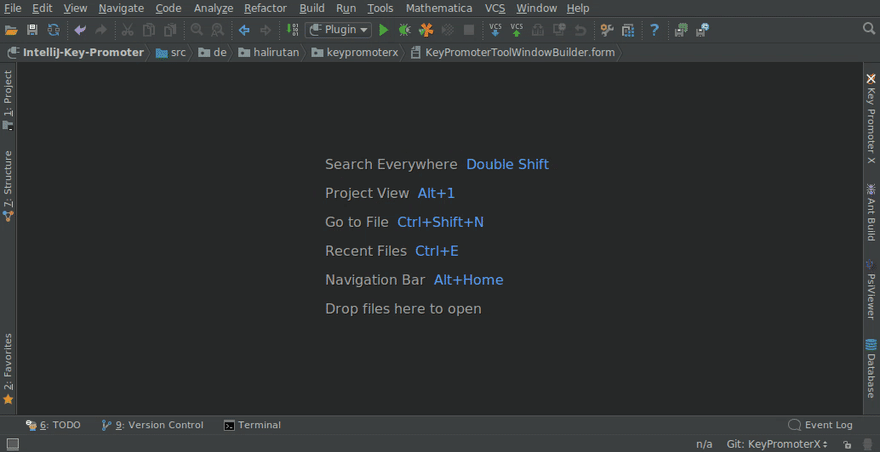
3. Search Everywhere

Use Search Everywhere Shift-Shift for configuring some settings, not only for searching the codebase. Some shortcuts are hard to remember, but now you can easily find them.

Try this: next time when you see some unused imports in the code, just double press Shift key, type “imports”, scroll to the bottom, chose “Optimize Imports”.

4. Syntax Aware Selection (Ctrl + W)

Use magical Ctrl + W shortcut to select a part of the code and increase its scope or decrease with Ctrl+Shift+W.

For me, it is the most used shortcut in IntelliJ IDEA. Many web browsers map Ctrl + W for closing the tabs, which is also one of the most used actions. No surprise why the IntelliJ team ended up choosing this mapping for Syntax Aware Selection.

5. Navigate Back/Forward (Ctrl + Alt + Left/Right)

It helps to navigate the cursor to the previous locations. You can jump easily from files and folders without losing track. It also works perfectly with side mouse buttons.

FYI: Navigate to last edit location (Ctrl + Shift + Backspace)

This will bring your IntelliJ experience to a whole new level. Can’t imagine my life without it! Probably, I would’ve got fired for underperformed and committed suicide. Ctrl + Alt + ←/→, thanks a lot!

6. For copy & paste lovers

I know you love Ctrl + C, Ctrl + V. But then you will love Ctrl + Shift + V. By using it you can paste from history.

By default, it stores 5 recent copies that you made. I suggest you increase that limit to something like 26. To do that use Tip#3 and type: Maximum number of contents to keep in clipboard

7. Reformat code (Ctrl + Shift + L)

It works perfectly for fixing basic code formatting issues (e.g. putting whitespaces before the brackets, fix indentations, etc).

I mostly use it for already selected part of the code. Combine it with Tip#4 and the results are charming.

8. Go to

Here are the useful shortcuts for productive navigations:

Go to File (Ctrl + Shift + N): I use this command a lot, it’s faster than Search Everywhere and less noisy.

Go to Symbol (Ctrl + Alt + Shift + N): I use it mostly for searching the methods and variables.

Go to Line (Ctrl + G): for navigating to the line number

10. Measure your Productivity

Go to Help | Productivity Guide.

Voila! You have your stats already!

img_1.png

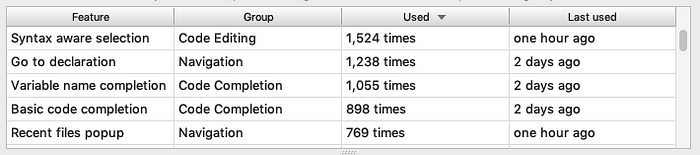
My Top-5 most used features in Intellij IDEA

I have lots of never-used features on that list. Need to grasp and explore more.

11. Find Actions ( Ctrl+Shift+A )

Let’s face it: searching the menus and toolbars in an attempt find out that action you need is an huge waste of time. 
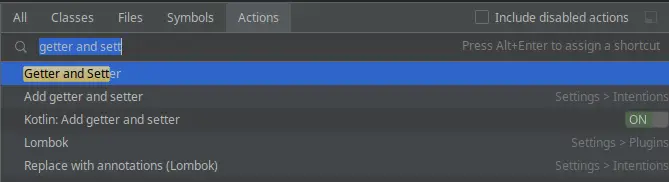
You can just rely on Find Action command (Ctrl+Shift+A) to quickly locate what you need.

The Find Actions UI will show a list of available actions. Type in the action you’re looking for to learn more. For example, if you want to add Getter and Setter methods to your class, just start typing “getter…” and the Find Actions will suggest all matching actions:

img_2.png

12. Code Completion (Ctrl + Space)

Every decent editor is able to propose code generation while coding your classes. With IntelliJ code generation is really on steroids. You can use it at different levels (basic / type matching). However, even in its most basic form, just it Ctrl + Space while coding, and it will save you lots of time.

For example, you have a variable “greeting”. As you start typing that variable in your code, press Ctrl+ Space. It will automatically propose to add getter/setter methods for it:

img_3.png

· 8 min read
Grejo Joby

git config

Setup author name and mail to be used for all commits in current repository, Devs commonly use --global flag to set config options for current user.

git config --global user.name "username"
git config --global user.email "usermail@example.com"

git clone

Clone the remote repository with HTTPS or with SSH. This should create a new child directory for the project sources.

git clone <REPO CLONE URL>

git status

Shows the status of your current branch. It will tell you which files you have modified, which files are stages for commit and which files are not. It will also let you know if your local branch is behind, or not up to date with, its remote tracking branch. This command is particularly useful in combination with git add when you only want to commit certain files.

git branch

Create a branch, or show a list of local or remote branches. With git branch, you can add options to do branch-related things:

git branch new-branch-name : Create a branch off of the current branch named "new-branch-name"
-d or --delete : Delete a branch. e.g. git branch -d feature-branch-name

-D : Force delete a branch. This is used when you want to delete a branch that has changes that weren't pushed to the
server or merged. e.g. git branch -D feature-branch-name

-a or --all : Display all local and remote-tracking branches.

git fetch

Fetch branches from the server, along with their history and information. You can also use git fetch origin to update your remote-tracking branches.

git pull

Update your working directory by performing a git fetch, followed by a git merge. This is useful if you want to bring your branch up to date with the remote-tracking branch. You can also use the --rebase option to perform a rebase rather than a merge.

git checkout

This command has a few functions. It can be used to create a new branch off of the current branch, it can be used to check out a branch from the server, or switch to another branch.

git checkout develop

You will use this a lot. It will switch you from whatever branch you are currently in to the develop branch. If you have changes in your current branch, you will need to either stash them or undo your changes before you switch branches

git checkout branch-on-server

If you want to work on another persons branch (assuming they already pushed their branch to the remote repository), you can use this command to create a copy of the branch on your local machine. You will need to do git fetch first to grab the information about the branch.

git checkout -b new-branch-name

Create a new branch off of the current branch and switch to that branch. If you are in develop, this will create a new branch from develop. This command is synonymous to git branch new-branch-name && git checkout new-branch-name

git add

You made changes to your branch, and you want to stage your changes for committing. You will need to add them to what is known as the index. Here are two ways to do this:

git add /filepath/file.f: this will add the single file

git add .: this will add all the changed files. Be careful here; make sure you aren't adding unwanted changes by reviewing your changes using git status. If you accidentally staged unwanted files, take a look at git reset described below.

git commit

You want to make a commit! Awesome! Here's how you do it:

git commit: This will make a commit of the files you have staged using git add, and will open a VIM editor (or whichever editor you have configured in your .gitconfig) to enter your commit message

git commit -a: This will make a commit and add all changed files, and will open an editor to enter your commit message. This is the same as doing git add . && git commit

git commit -m "commit message": Skip the editor and put your entire message in the command line

git commit -a -m "commit message": Combine them all! Fab

git commit --amend

git push

Once you make a commit, you will need to push your changes to the server to make it visible to the world. Once you push, your branch and commit(s) will be visible to others.

git push branch-name or git push origin HEAD: Push your branch upstream. You can use either version; using origin HEAD is simply a more verbose way of pushing. It signifies you are pushing the tip (HEAD) your branch to the same name on the remote origin

git push origin -f branch-name or git push origin +branch-name:

❗ ❗ ❗ BE CAREFUL: This is a potentially scary command, and you should only use it if you really know what you are doing. It will overwrite the branch you specified on the remote repository with your local copy of the branch. ❗ ❗ ❗

git log

Show the history of all branches and their commits. Useful for seeing the most recent commit and getting commit hashes.

git log: Show all commits on this branch, along with the commit hash, author, date and message

git log --oneline: Show a simplified version of the above command, showing only the commit hash and commit message

git log --graph: Show a graph of the commit history for your branch.

git log --max-count <n>: Limit the number of commits shown

git log --oneline --graph --max-count 50: Combined them all! Woo

git rebase

Rebasing is a bit more advanced, but incredibly useful when you need it. When you perform a rebase, you are changing the base of your branch. In essence, a rebase will look at each commit on your branch and update the code to make it seem like you've been working off the new base all along. Sometimes, a rebase will barf if it encounters a situation in which it tries to update a piece of code that you have already modified. In this case, it doesn't know which version of the code to use, so it leaves it to you to resolve them manually. Although they have similar uses, a rebase differs from a merge in that a rebase updates your branch by tweaking each commit, and merge will update your branch by creating a new commit at the tip of your branch. Usually, there are standards and practices employed in a project or team around which method is preferred. Have a discussion with your team about which workflow they prefer.

git stash

Stashing allows you to save your current unstaged changes and bring your branch back to an unmodified state. When you stash, your changes are pushed onto a stack. This is especially useful if you need to quickly switch to another branch without having to commit your incomplete changes.

git stash: stash your unstaged changes

git stash pop: unstash your changes

git stash drop: drop your stashed changes. Careful, you will lose your changes

git stash push <path>: stash a single file

git stash -m <message>: add a message to your stash

git reset

Git reset is used to unstage files or remove commits. It does so by changing what the tip of the branch (HEAD) points to. Three trees are affected by a reset:

HEAD: the tip of your branch Index: the staging area, which is like a proposed commit Working Directory: the files currently on your disk. There are three reset modes: --soft, --mixed (default), and --hard.

Undo git add

git add .
git reset -- file.html (unstage single file, or)
git reset (to unstage all)

Undo most recent commit

git commit -a -m "commit message"
git reset --soft HEAD^ (undo commit that is at the tip of the branch)
git commit -a -m "new commit message"

Undo a commit permanently

git reset --hard HEAD~2 : Destroy the last two commits, i.e. HEAD and HEAD^

gitk

Gitk is a graphical repository browser. It was the first of its kind. It can be thought of as a GUI wrapper for git log . It is useful for exploring and visualizing the history of a repository. It's written in tcl/tk which makes it portable across operating systems.

Displays changes in a repository or a selected set of commits. This includes visualizing the commit graph, showing information related to each commit, and the files in the trees of each revision.

· 2 min read
Grejo Joby

meter & progress

The progress element is the semantically correct way of displaying progress bars. The meter element is progress on steroids. Apart from displaying a scalar measurement within a known range, it allows you to specify the value's low, high & optimum range.

0_-meter.gif

sup & sub

You can add superscripts (like x²) with sup and subscripts (like x₀) using sub to your document.

img_1.png img_2.png

datalist

datalist allows you to add an autocomplete suggestions to your input elements.

img_3.png

Note

  • The suggestions are NOT LIMITED to text inputs, but can be used with color, date, time, and even range inputs.
  • The default styling of the suggestions is unpleasant to look at, to say the least. But, you can always style it using CSS.

map & area

map and area allow you to create image maps, which is a fancy term for images with clickable areas.

details & summary

details and summary are used to create collapsible content without using any JavaScript. It's the semantic method of creating dropdowns.

img_4.png

object

Pulling your hair out to embed files on your website? Look no further!

object allows you to embed a wide range of files like PDFs, images, videos, audio and even Youtube videos.

img_5.png

abbr

The abbr element allows you to add abbreviations to your document. When the user hovers over the abbreviation, the full form is displayed. Moreover, screen readers can also be configured to read out the full form when an abbreviation is encountered.

img_6.png